What is Pressure Decay Leak Testing?
The Pressure Decay test, also known as gauge decay, absolute pressure, leak drop or delta pressure leak test. This test method measures the drop in pressure on a gauge (transducer) during the leak test. Pressure decay leak testing is used to test products for leaks by trapping pressure inside a product and then measuring pressure loss.
In this test method the component is pressurized with air and the pressure transducer monitors the pressure for negative changes. Any pressure drop indicates a leak. The pressure change from the first measurement to the last measurement made during the test phase of a test is what is important.
The test is very fast, a matter of seconds, and is therefore popular for leak testing in high-volume industries such as automotive components, castings, medical devices and consumer goods.
How is a Pressure Decay Test performed?
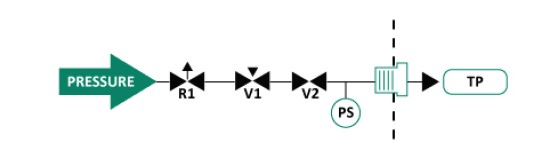
To begin the Pressure Decay leak test, the test part [TP] is attached to the test port. The tester then pressurizes the part with pressure [+P] to the desired test pressure set by the pressure regulator [R1] during the Fill step by opening valves [V1] and [V2].
Upon completion of the Fill step, pressure is trapped inside the part as [V2] closes. After a slight delay, [V1] closes allowing the line between [V1] and [V2] to vent to atmosphere through [V1] allowing any leakage through [V2] to cause the tester to see this leakage and fail all tests. The extra valve allows for a fail-safe configuration.
Trapped pressure inside the test circuit is held through the Stabilize step and then measured by the testers pressure sensor [PS] during the Test step.
If the part exceeds the programmed leak tolerance (pressure drop over time or quantified leak rate), the tester’s display indicates the reason for the test failure and displays the pressure loss or leak rate in user defined units of measure.
Upon completion of the Test step, pressure trapped in the part is vented to atmosphere through [V1] by opening [V2] during the Vent step, and the tester is ready for the next test.